Why upgrade
v2 schedules unlock two display options that aren’t available on legacy (v1) schedules:
- Appointments — show your appointment services and live availability inside the schedule
- Gift Vouchers — let customers buy gift vouchers from the schedule
Everything else a v1 schedule can do, a v2 schedule can do — usually better. If you’re still running v1 schedules, upgrading is the recommended path.
What “upgrade” actually does
The upgrade is one-way, but it’s designed to be seamless:
- All your configuration is preserved — categories, colour, questionnaire, passes, subscriptions, restrictions, the lot
- The schedule becomes a v2 schedule, gaining the v2 editor and new features (appointments, gift vouchers)
- Nothing on your website needs to change. The embed code already on your site detects the change and automatically loads the v2 schedule from our CDN
- Everything that worked before still works — you get the previous functionality plus the new v2-only features
One-way: once you’ve upgraded, the schedule can’t be reverted to v1. Configuration and existing setup carry across automatically, so there’s no data loss to worry about — but if you specifically need the legacy v1 interface back, you can’t get it.
Watch the full process (20 seconds)
Step-by-step
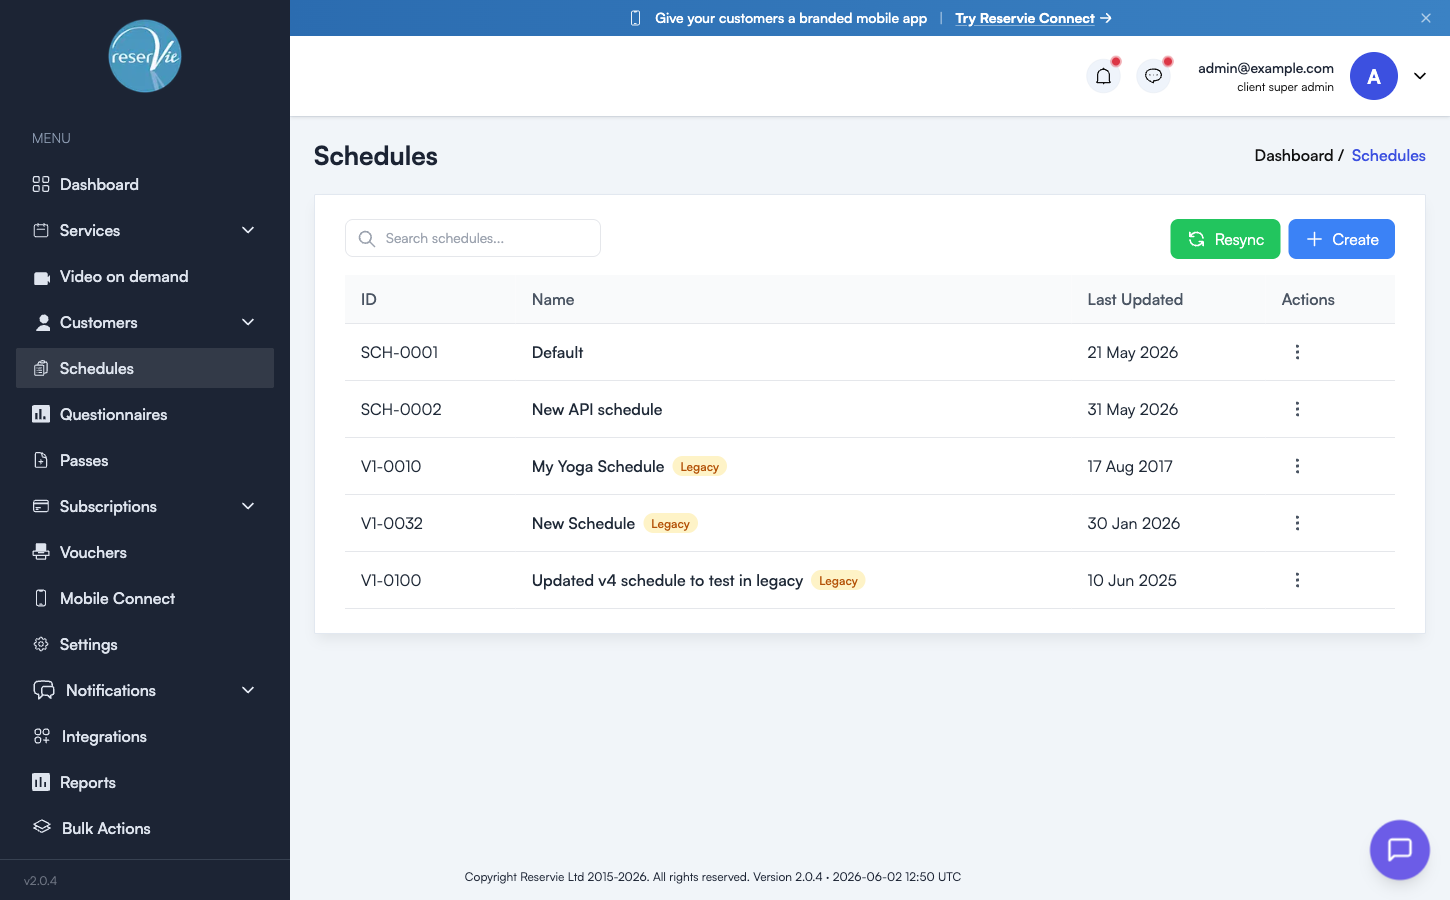
1. Find the legacy schedule
Navigate to Schedules from the sidebar. The Schedule Navigator lists every schedule. Legacy schedules carry a Legacy badge next to the name and have IDs starting with V1-.
2. Open the schedule for editing
Click the ellipsis (⋯) button on the right-hand side of the row, then choose Edit.

3. Scroll to the bottom of the edit form
At the bottom of the editor, below the standard schedule settings, there’s a panel headed “This is a legacy schedule” with an Upgrade to v2 button.

4. Click Upgrade to v2
An inline confirmation appears asking “Are you sure? This will archive the legacy schedule and create a new v2 version.”
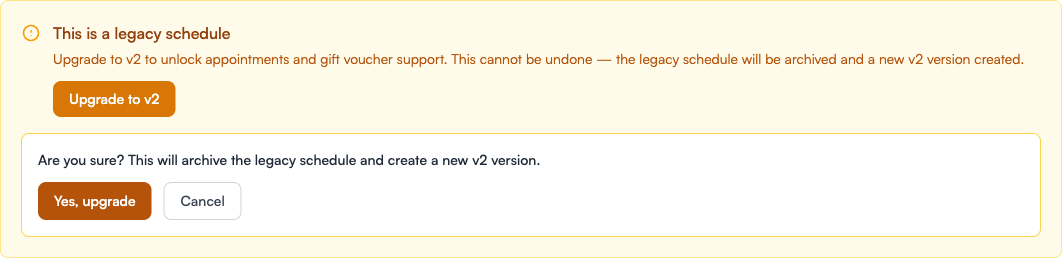
Click Yes, upgrade to proceed, or Cancel to back out.
That’s it
Once the upgrade completes, the schedule shows up in the Navigator without the Legacy badge, and the v2 editor opens with all your previous settings already in place. No website changes are needed — the embed code already on your site automatically loads the v2 schedule from our CDN.
Common questions
Do I need to update the embed code on my website?
No. The embed code you previously added is smart enough to detect that the schedule has been upgraded and will fetch the v2 schedule scripts from our CDN automatically. Customers see the new v2 schedule the next time they visit your booking page.
Can I undo the upgrade?
No — the upgrade is one-way. That said, your configuration is preserved and all v1 functionality continues to work in v2, so there’s no data loss involved. The only thing you can’t roll back is the v1 editor itself.
Do I need to upgrade all my schedules at once?
No. Each schedule is upgraded independently. You can leave v1 schedules in place indefinitely; upgrade them as and when you need the v2-only features.
Where to go next
- Getting Started with Schedules — the v2 schedule editor in full
- Adding Reservie to your Website — how the embed code gets onto your site